So now that my designs are out in the wild (check this thread if you haven’t yet! ) and I
wanted to give the community an idea on how the miniature design process works
for me. It varies from designer to
designer, and from digital sculpting to traditional sculpting, but this is how
I do it.
Now I want to start this off by saying that I am not an
artist or even a CAD designer by trade.
I work my day job as a computer engineer and happened to pick up CAD
work as part of an internship about four years ago. Throughout the last few years I have worked
in it on the side, but I really didn't do anything significant until the last
year or so, when I made a Vulture III and a Thor II last winter.
Now I use Autodesk Inventor.
It is a mechanical CAD
program. I know other designers
use Dassault Solidworks (a Mechanical CAD), Autodesk Maya (a CAD program aimed
at animation and video games) and Pixologic ZBrush (also an animation
CAD). Essentially, you have CAD that is
for designing parts and CAD for computer graphics. I come from the part design world. My experience is in both Dassault CATIA and
Autodesk inventor. CATIA is an extremely
high end software, which also makes it prohibitively expensive. Inventor is free for anyone with a .edu email
address, and since I am still taking master’s courses, it fits me perfectly,
free.
Now because I work in mechanical CAD, rather than a Mesh or
Node editor CAD, the way that I design my miniatures is different from how some
of my colleagues may. I start with 2D
sketches and push and pull them into 3 dimensional objects. Now, if you want an in-depth look at that
exact kind of thing, take a look at my personal blog posts on designing the
Thor II: http://randominterestsofanaverageman.blogspot.com/2014/02/the-making-of-model-part-1.html.
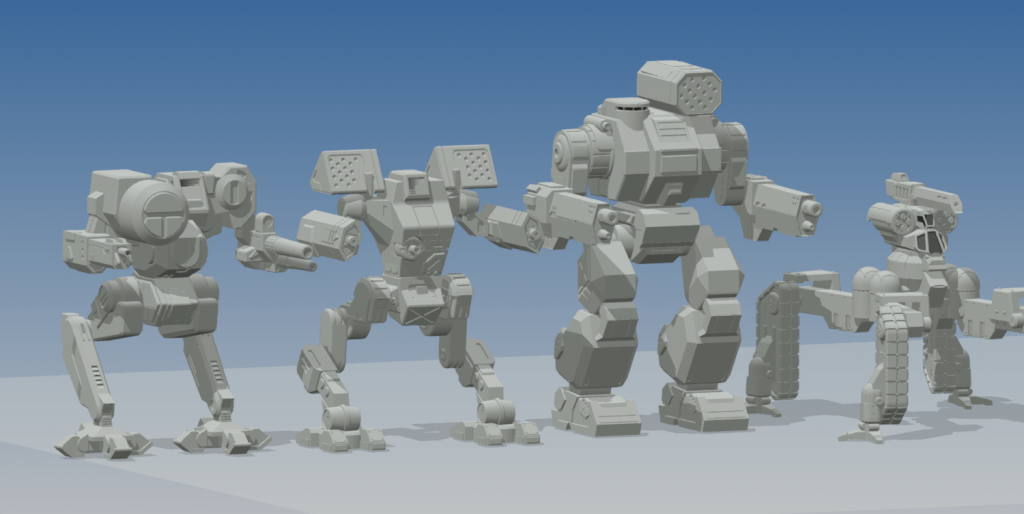
Now I have worked on four miniatures for IWM (5 if you
include my not-accepted Vulture III), and they are a bit of a hodge-podge. Thor II. Arctic Wolf II. Arion. Chimera. Typically, IWM plans what minis they want to
produce for the year, and then assign sculptors to work on them and get them
released. Anything that is not put on
the schedule is added as an online exclusive.
So when I completed both the Thor and the Vulture, they were slated to be online exclusives. Part of the reason
for this also is that my CAD style hasn’t been perfected yet, and some designs,
curvier designs, are still difficult for me to capture properly.
Moving on.
So now you know what software I use and why most of my work
is Online Exclusives, so let’s talk about the designs I work with and the QCC process.
First things first, I pick a ‘Mech. We all know what IWM’s release schedule is
for the year, and what ‘Mechs have already been made, so I immediately remove
them from my list of possible choices.
From there, I pick a ‘Mech that fits my CAD style. Something a little blockier. My first attempt was the Vulture III. Very blocky, very geometric. No smooth curves, no difficult to model
surfaces. The Thor II was also a solid
choice in this respect. The Arion also
fit this style of mine, though to a lesser degree, and because of this, I hit a
few snags, which I may or may not cover later.
Now, I also love Mechwarrior 4. It is what got me into Battletech, got me
into Miniatures, and started the downward spiral I call a hobby. This game has also directed some of my
designs here and it is the reason I chose both the Arctic Wolf II and the
Chimera to work on. The Arctic Wolf also
happened not to have a miniature yet, and there definitely are some people
looking forward to this mini. The
Chimera on the other hand, well, I just did not like the existing mini. Tiny legs with a huge body, and a lot of the
details I just felt were off. So, I
decided to take a crack at resculpting it.
Now, when I went into the Vulture and the Thor initially, I
had no intention of doing alternate configs.
But when I always finishing the Thor, I saw the Dark Age mini, and saw
the stats, and decided to make the missile box arms also. From there, I have decided to make alt
configs for all of my minis when they are available. Meaning, if there is a reasonable alt config,
my minis will probably include one of them at least. We’ll go into more details on those when we
start talking about the full QCC process, probably in part 2.

Typically, for CAD designers, we start making the entire
miniature, but without any details on it.
We want to decide on the height of the mini, and make sure the basic
proportions are dead on. I will be using
the Chimera as my example here. I
gathered as much source art as physically possible, which really isn’t much at
all. There is the TRO image, and
luckily, this is a ‘Mech from Mechwarrior 4.
Even better yet, it was designed for Mechwarrior 4 and put into TRO:
3067 after that game was released. So, I
hopped into the game a took a few screenshots:


Also, I found an image from the Battletech Pods to use as a
reference, this piece of art right here, which also conveniently lined up
really good with the source art:
From there, I made my first run at the basic shape of the
mini, check it out:
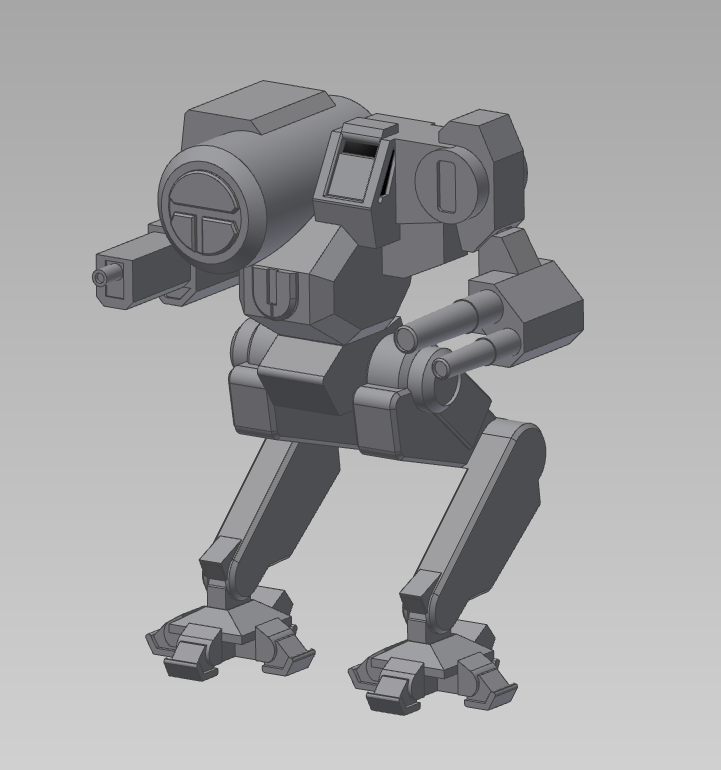
This is what I showed IWM when I asked if they wanted to
resculpt the mini, and it is what was first submitted to the quality forum for
my peers to review. You can quite obviously tell that there are some issues with this block out. Small legs are the immediate issue, but there are more. The IWM quality forum helped me get rid of some of these problems.
What did they have to say? Well, that will have to wait for
part 2…
No comments:
Post a Comment